Scaling Cross-Study Analysis with Parsl
The concept behind Cross-Study Analysis (CSA) is detailed here. To enable parallel execution, Parsl parallel processing library [1] is used to implement the cross-study analysis workflow. The figure below illustrates the cross-study workflow with Parsl. The main components of the workflow - preprocess, train and infer - are implemented as Parsl apps, each returning ‘futures’ that monitor progress of the execution. For example, once preprocessing for CCLE split 1 is complete, the corresponding ‘preprocess_futures’ will trigger training for CCLE split 1. Inference begins after training, as indicated by ‘train_futures’. Parsl also allow parallel execution using multiple GPUs, as specified by the user. The cross-study analysis workflow using Parsl has been successfully implemented on the GraphDRP model using multiple GPUs on the Lambda machine managed by CELS at Argonne National Laboratory.
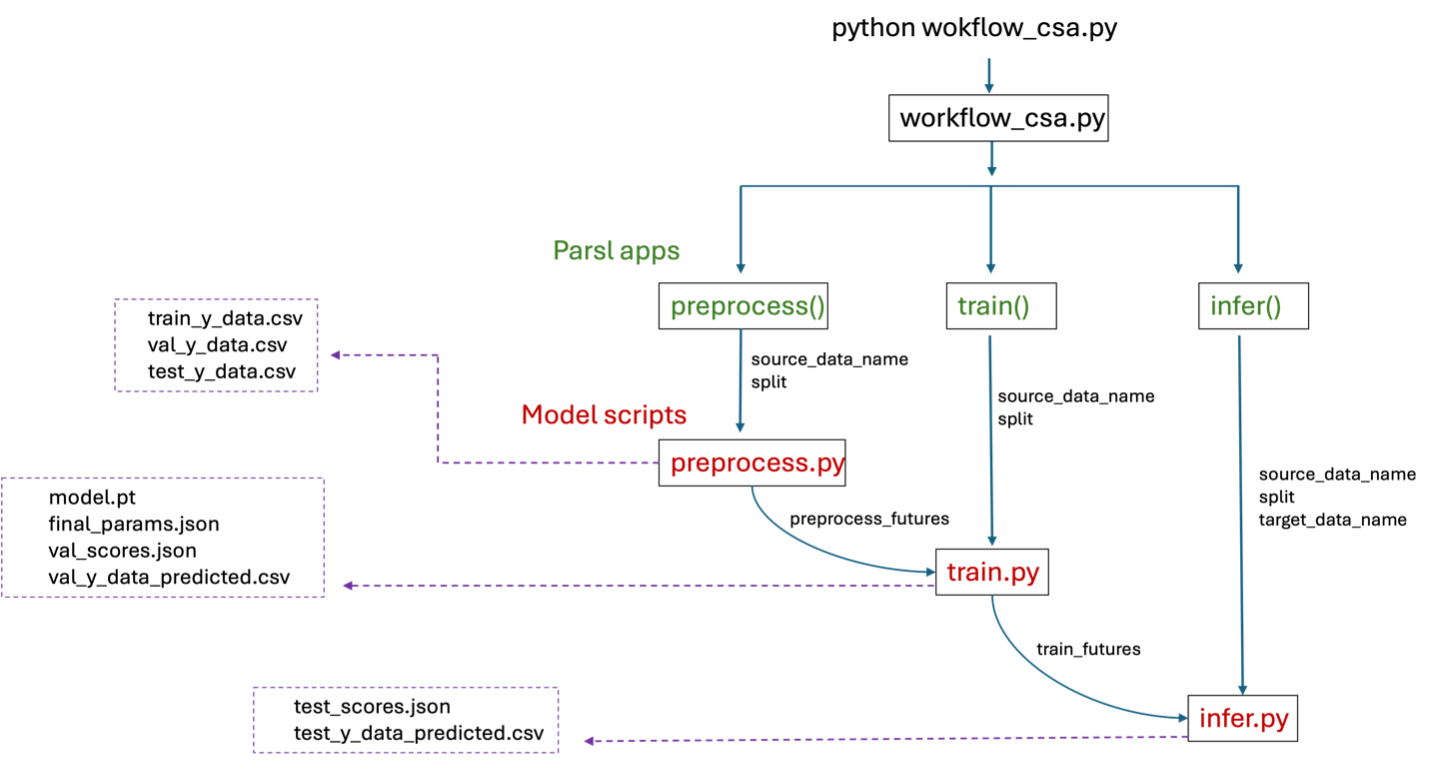
Cross-study analysis workflow using Parsl parallel processing library
Setting up CSA with Parsl
This Parsl workflow has been configured for use on lambda at Argonne National Laboratory. For other systems, we recommend using the Brute Force method.
1. Create and activate a conda environment to support improvelib and Parsl
conda create -n parsl parsl numpy pandas scikit-learn pyyaml -y
conda activate parsl
2. Clone the model repository
git clone <MODEL_REPO>
cd MODEL_NAME
git checkout <BRANCH>
Important
Model scripts must be organized as:
<MODEL_NAME>_preprocess_improve.py
<MODEL_NAME>_train_improve.py
<MODEL_NAME>_infer_improve.py
Make sure to follow the IMPROVE lib documentation to ensure the model is compliant with the IMPROVE framework.
If the model uses supplemental data (i.e. author data), use the provided script in the repo to download this data (e.g. PathDSP/download_author_data.sh).
3. Clone IMPROVE repo and set PYTHONPATH
Clone the IMPROVE repository to a directory of your preference (outside your model directory).
cd ..
git clone https://github.com/JDACS4C-IMPROVE/IMPROVE
cd IMPROVE
git checkout develop
source setup_improve.sh
4. Download benchmark data for cross study analysis
Download benchmark data to the data destination directory using this. For example:
./scripts/get-benchmarks ./workflows/parsl_csa
5. Modify configuration file as needed
csa_params.ini contains parameters necessary for the workflow. The user can change the parameters inside this configuration file.
input_dir: Path to the benchmark raw_data for cross study analysis.input_supp_data_dir: Dir containing supplementary data in addition to csa benchmark data (usually model-specific data). A common practice is to provide these data inside a dedicated dir inside model dir (e.g., PathDSP/author_data/…).output_dir: Path to the output directory. The subdirectories in the output_dir will be organized as:ml_data: Contains pre-processed data.
models: Contains trained models.
infer: Contains inference results.
source_datasets: List of source datasets for cross study analysis. With the current benchmark datasets this can be a subset of CCLE, gCSI, GDSCv1, GDSCv2 and CTRPv2.target_datasets: List of source datasets for cross study analysis. With the current benchmark datasets this can be a subset of CCLE, gCSI, GDSCv1, GDSCv2 and CTRPv2.split: Splits of the source datasets for cross study analysis.hyperparameters_file: Path to the json file containing hyperparameters per dataset. In this template two hyperparameter files are given:hyperparameters_hpo.json: Contains hyperparameters optimized separately on all source datasets.
hyperparameters_default.json: Contains default values of the hyperparameters for the model.
model_name: Name of the model for cross study analysis.model_scripts_dir: Path to the model directory containing the model scripts.model_environment: Name of your model conda environment.epochs: Number of epochs for the model.available_accelerators: List of GPU ids to launch the jobs. The required format is: [“id1”,”id2”]. For example, if you want to choose GPUs 0 and 1 set available_accelerators = [“0”,”1”]y_col_name: Response variable used in the model. eg: aucuse_singularity: True, if the model files are available in a singularity container.singularity_image: Path to the singularity container image file (.sif) of the model scripts (optional).only_cross_study: True, if only cross study analysis is needed without within study inferences.
Note
hyperparameters.json contains a dictionary of optimized hyperparameters for the models. The key to the dictionary is the model name, which contains another dictionary with source dataset names as keys. The two hyperparameters considered for this analysis are: batch_size and learning_rate. The hyperparameters can be optimized using Supervisor or DeepHyper.
6. To run cross study analysis using Parsl:
Note
We recommend running a test with two target datasets, one source dataset, and two splits with two GPUs before performing the full run.
For testing purposes, change:
source_datasets = ["gCSI"]target_datasets = ["gCSI", "CCLE"]split = ["0", "1"]
For complete runs, change:
source_datasets = ["gCSI", "CCLE", "GDSCv1", "GDSCv2", "CTRPv2"]target_datasets = ["gCSI", "CCLE", "GDSCv1", "GDSCv2", "CTRPv2"]split = ["0","1","2","3","4","5","6","7","8","9"]
Execution without singularity container:
Make sure to change the model_name parameter in csa_params.ini to your <MODEL_NAME>.
Change the model_scripts_dir parameter in csa_params.ini to the path to your model directory.
Change the model_environment parameter in csa_params.ini to the name of your model conda environment.
Make changes to csa_params.ini as needed for your experiment.
Preprocesssing:
python workflow_preprocess.py
To run cross study analysis with default configuration file (csa_params.ini):
python workflow_csa.py
To run cross study analysis with a different configuration file:
python workflow_csa.py --config_file <CONFIG_FILE>
Execution with singularity container:
Set use_singularity = True in csa_params.ini.
Change the
singularity_imageparameter incsa_params.inito your <PATH_TO_YOUR_SINGULARITY_CONTAINER>.Change the
model_nameparameter incsa_params.inito your <MODEL_NAME>.Change the
model_scripts_dirparameter incsa_params.inito the path to your model directory.Change the
model_environmentparameter incsa_params.inito the name of your model conda environment.Make changes to
csa_params.inias needed for your experiment.
Preprocess the raw data:
python workflow_preprocess.py
To run cross study analysis with default configuration file (csa_params.ini):
python workflow_csa.py
To run cross study analysis with a different configuration file:
python workflow_csa.py --config_file <CONFIG_FILE>
7. Analyze results
After executing the workflow, the inference results, including test data predictions and performance scores, will be available in the output directory specified by the user. These results will be organized into subfolders based on the source dataset, target dataset, and split. To collate and summarize these results, see Post-processing results from cross-study analysis (CSA).
References
1. Y. Babuji et al. “Parsl: Pervasive Parallel Programming in Python”, 28th ACM International Symposium on High-Performance Parallel and Distributed Computing (HPDC), 2019